[ad_1]
Ableton announced Live 11 in mid-November and now it’s finally here. The latest version of his incredibly popular DAW has come out of beta and available to everyone.
The list of new features in Live 11 is long and impressive: Comping; linked track editing; MPE support; expression editing; live tempo tracking; macroeconomic improvements; updated devices and soundpacks; five New fixtures, including a hybrid reverb and a new pitch change plugin; tools of chance; plus a host of improvements to Max for Live.
This is in addition to many small interface tweaks and push support updates.
I’ve been using the beta since its announcement in November and while I haven’t put all the new features to the test, I can unequivocally say that Live 11 is a solid upgrade from 10 and well worth it. your time. Just be aware that Live 11 is a bit more resource hungry than Live 10. And Live 10 was a lot more resource hungry than Live 9. So if your machine was already struggling after the last big update, you might want to be waiting to be able to upgrade your hardware too. Here’s a quick rundown of what’s new and great features (for me).
MEPs
Terrence O’Brien / Engadget
Let’s probably start with the selection function – MPE support. Ableton Live is one of the last major DAWs to add support for MIDI polyphonic expression. Bitwig has it, Logic has it, even the Garage band has it. This means that instruments that respond to MPE like Arturia’s Pigments and sonicLAB’s Fundamental can be even more expressive when paired with the right controller, like the Sensel Morph. I mention these two in particular because they have been my testing grounds for exploring MPE. (They couldn’t sound more different either.)
Ableton has been smart enough to update a few of its base instruments to support MPE as well, like Wavetable and Sampler. You can find presets under “MPE Sounds” in the browser if you want to quickly splash around and explore. Ableton has also included MPE control and expression control features, which you can find under MIDI Effects. These allow you to decide exactly how you want to use the different MPE functions and map them quickly and easily. MPE Control also allows you to take advantage of some of the tools available on an MPE controller, even if the instrument you are using does not support it. So, for example, you can fire up the Ableton Analog, check a few boxes in MPE Control, and drag your fingers to trigger pitch bends and move the mod wheel. To be clear, you can still do this, but it’s a lot easier to set up now.
It might sound minor, but I think one of the barriers to adopting MPE controllers is getting them to play well with non-MPE software. I don’t want to spend an hour creating a custom mapping for each virtual instrument. I want to connect my Morph or Roli and make it work as expected. It is a big step in this direction. Especially since in my experience your settings will need a lot of tweaking to get the most out of MPE and it really simplifies the process.
You can still enjoy many features of MPE even if you don’t have a compatible controller by using Ableton’s new expression editing tools. These allow you to dive in and manually adjust pitch bends, modulation, and per-note aftertouch, just like you would any other automation channel. It’s intuitive and straightforward, and might even convince a few more people to adopt MPE once they get a taste of what it has to offer.
Comping
Ableton
The other headlining feature, at least for me, is comping. This simply allows you to record multiple takes of the same section of a song without stopping, and then easily combine the best parts. (I can already hear a bunch of purists screaming ‘this is cheating’, but they are wrong.) Now I’m quite ready to admit that my technical skills as a musician are mediocre at best and I can being a bit sloppy, so Just being able to record eight takes in a row without stopping is huge.
Plus, it’s a feature that many other DAWs have had for quite some time, so Ableton is playing a bit of catching up here. And you can get creative with the composition to create difficult juxtapositions or just squeeze out the best parts of a jam.
Comping works with both audio and MIDI, so whether you’re trying to nail down a vocals, guitar solo, or complicated chord progression with a VST, there’s something to be learned. And it’s incredibly easy to use. Basically each take is a “clip” (which will make sense to existing Ableton users) and they are grouped together as take tracks below the main track in the arrange view. Then just drag the markers back and forth to indicate where you want to switch between your takes. And then, if you want, you can bring those chopped bits into the session view so that you can trigger them separately to create new variations and combinations.
Linked track editing
It’s pretty straightforward, but it makes fine tuning multitrack parts easy. You can link a bunch of tracks together, and whatever you do to one of them, it’s automatically applied to the others as well. This is great for cutting up and automating double-track rhythm guitar parts, or if you have a melody playing on a piano and a synth at the same time, you sync them once and then start editing.
It also makes Ableton much more flexible if you are using it to edit, say, a podcast, or if you are working with video and audio simultaneously. Once everything is properly synchronized, you just need to link the tracks so that the changes you make don’t cause the tracks to skew.
And again, this works just as well with MIDI as it does with audio. In fact, you can link MIDI and audio tracks and edit them both at the same time. Sometimes I’ll use this as a way to get new musical ideas out of a long jam. I’m going to record MIDI and audio simultaneously, then go back and edit them as a linked track. The audio track gives me a preview of what the new part will look like, and when I want to record the freshly reconstructed melody without the harsh cuts, I have MIDI ready to go.
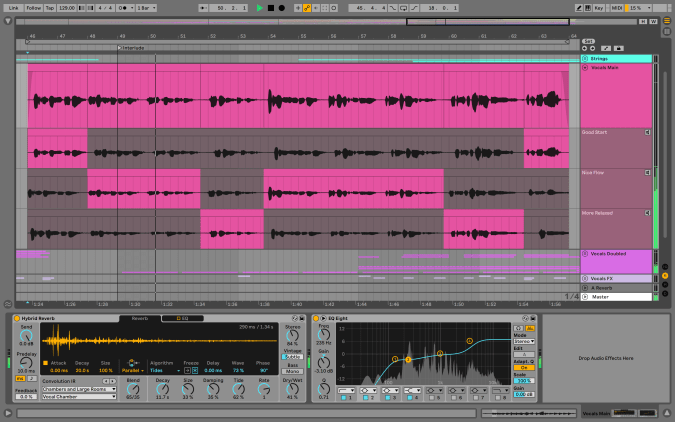
Inspired by nature

Terrence O’Brien / Engadget
There are a number of new sounds and devices in Live 11, but few caught my eye like the Inspired by Nature Pack. These instruments and effects use physical and natural models to determine sounds, modulation, and sequencing. The simplest of these is Bouncy Notes which drops a virtual ball when you play a note and when it bounces that note repeats. But you can draw walls and obstacles inside the “sequencer” (if you can call it that) that deflect the balls, or change things like launch angle and speed to create generative patterns. Likewise, Vector Delay uses a gravitational model and orbiting spheres to determine the parameters of a multitap delay.
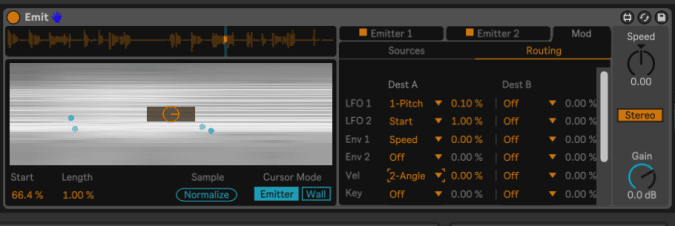
Terrence O’Brien / Engadget
Then there’s Emit, another bouncing ball / moving particle style device, but this one is a granular looper and synth. It has so many controls and modulation options that it can do everything from glitchy percussion loops, to atonal drones, to pretty plucked melodies, but all with a unique and slightly unpredictable curve. The 10,000 foot view is this: You have particle emitters that either go off automatically while your track is playing, or when triggered by MIDI. The particles then pass through the spectrogram of your sample. Honestly, it’s probably deep enough to write your own 1000 words. Just be aware that Emit is quite resource hungry. So, I highly recommend that you record your results as audio or at least freeze the track once you’re done.
Vector FM and Vector Grain work almost exactly like Vector Delay, except that they rely on FM and granular synthesis, respectively. Then there’s Tree Tone which is an odd sort of generative resonator instrument designed for drones and soft random melodies.
Probability and randomization
[ad_2]

